High-Fidelity Prototypes vs Low-Fidelity Prototypes: What’s the Real Difference
Table of contents
Let's talk
Reach out, we'd love to hear from you!
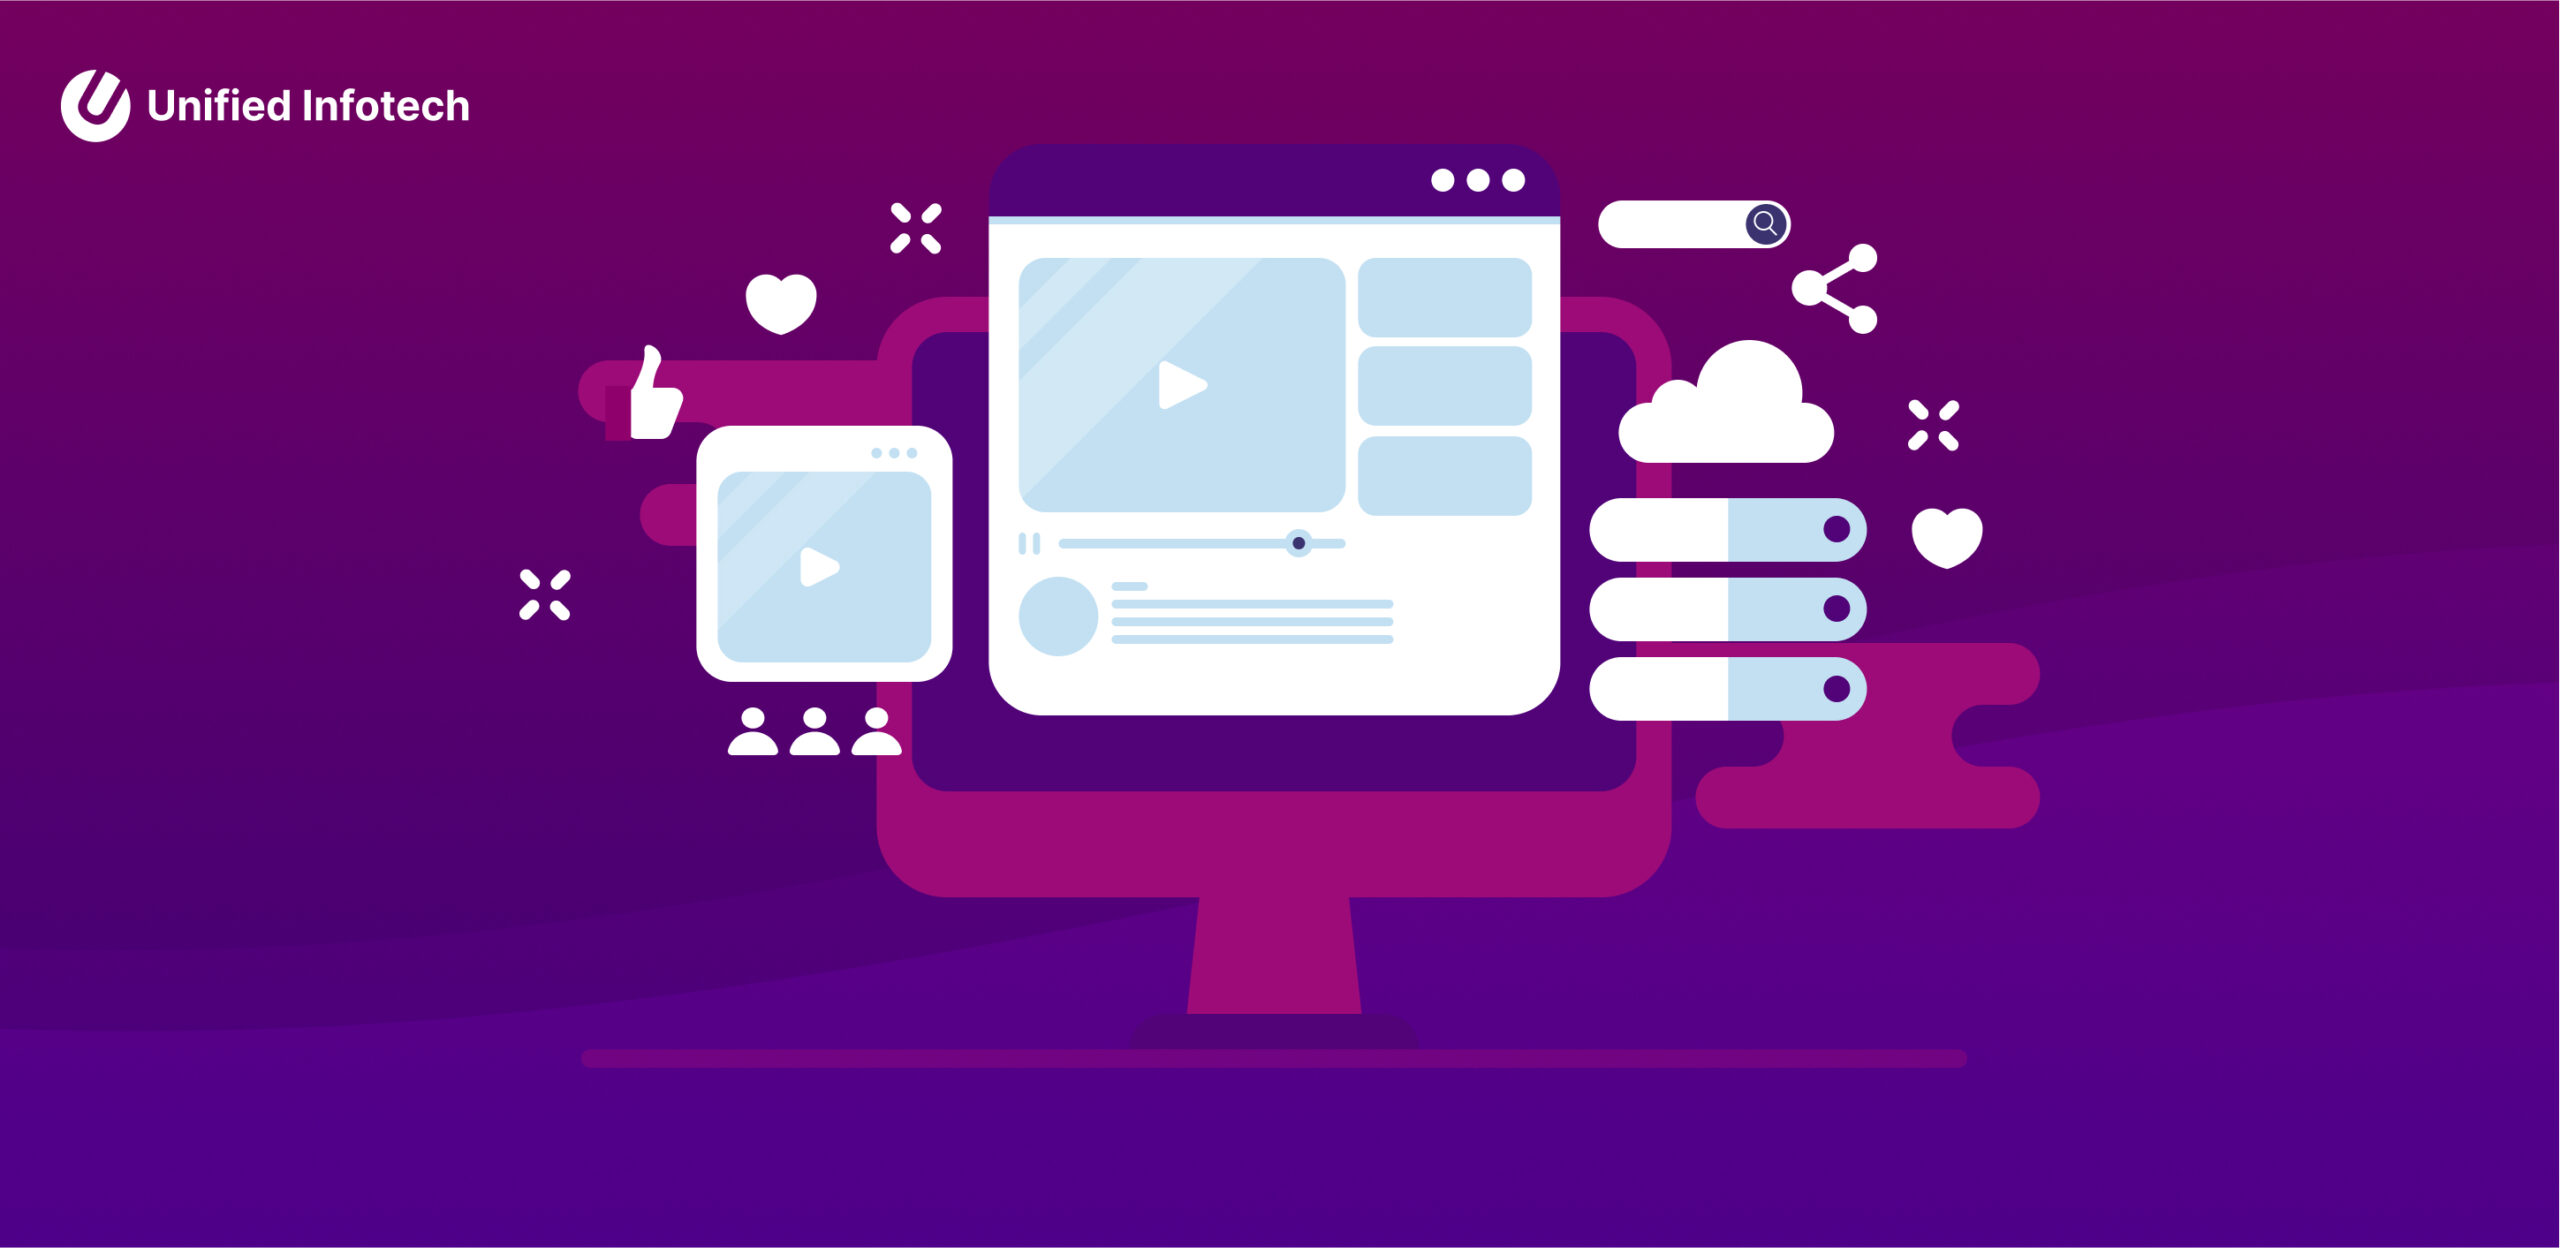
How does every update of Instagram, YouTube, and Spotify feel more and more intuitive? Well almost every update! The answer is simple – The best prototyping approach! Of course we’re talking about apps that have been around for what seems like forever, and any prototyping approach may be just a high-fidelity prototype, but you’ll be surprised to know that it may not be the case.
In this blog, our Technology Lead – UI/UX, Sreea Bhattacharya, dives into the power of UX prototypes, their critical role in the design process, and the distinctions between low-fidelity and high-fidelity prototyping, and choosing the best prototype level for your business use case.
Key Takeaways –
Learn about prototyping in UX design, why it matters, and what role do they play in successful UX design projects.
The Prototype fidelity spectrum in UX design
What are low-fidelity prototypes, their visual elements, interaction patterns and popular tools
What are high fidelity prototypes, their visual elements, interaction patterns and popular tools.
UX specific differences between low and high-fidelity, when to use which type of prototype level.
The advantages and limitations of each type of fidelity level – low and high
Choosing the best prototype fidelity for your project
What Are Prototypes in UI/UX Design?
Think of a prototype as the practice version or test run for your product.
It essentially provides a look at how your final interface may look like, providing a place for users to test functions, interactions, validate design language and even run basic usability tests before moving into the development stage.
The Role of Prototyping in UI/UX Design
Prototypes are important as they provide a kind of like a single-source-of-truth system for a UX design company; and for designers to easily communicate with stakeholders, collect feedback, explore ideas, test out the product, make structural changes, and ultimately refine the experience for users.
Why Fidelity Matters in User Experience Design?
Fidelity in prototypes determines the level of detail and realism, impacting how users and stakeholders perceive and interact with the design. Choosing the right fidelity ensures effective testing, clear communication, and efficient use of resources, aligning the prototype’s purpose with project needs.
The Spectrum of Prototype Fidelity in UX Contexts
Low-fi sketches and documents to high-fi interactive real-time models, and even mid-fi prototypes exist in the spectrum of fidelity in UX contexts.
For low-fidelity prototypes, it’s all about flow and structure, and not the final demo. For high-fidelity it’s all about creating the final-like environment, testing out interactions, understanding the visuals and the user journey.
The kind of prototype needed depends on the stage of the design process and testing plan. catering to different stages of the design process and testing objectives.
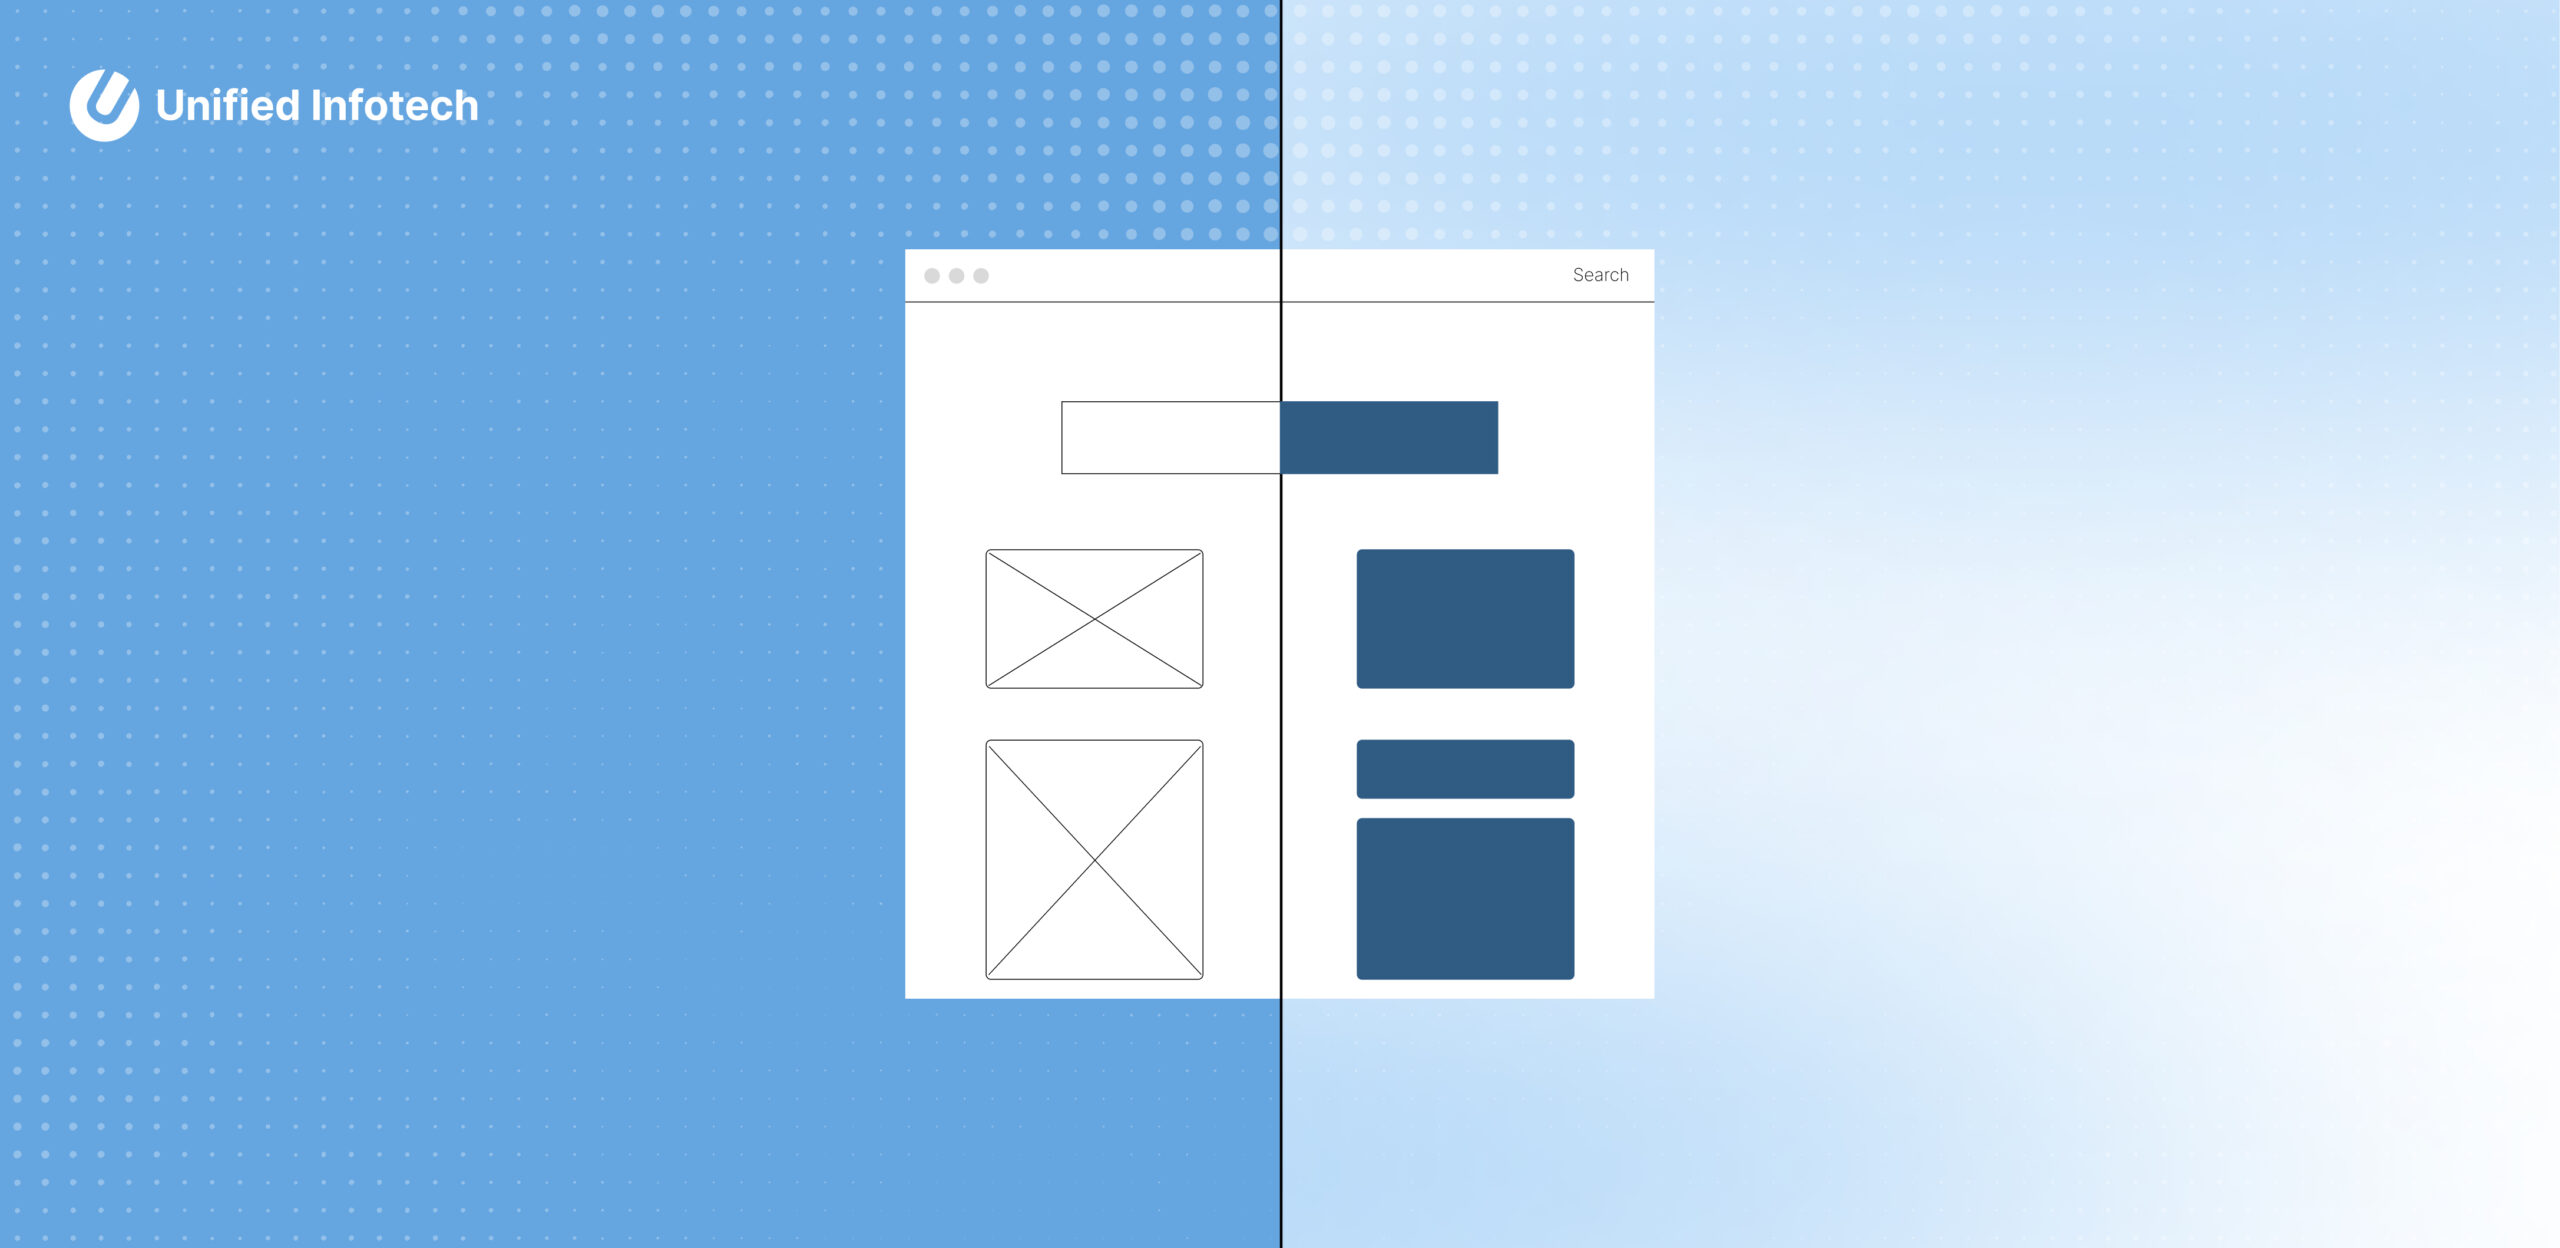
Understanding Low-Fidelity Prototypes in UX
A low-fidelity prototype, like the name suggests, is basically a sketch or the first draft of a design outline.
The focus is on setting the structure, and at this stage aesthetics are not the focus. In UX, it’s about user flows, basic layouts, major interactions. It’s all about rapid iteration for initial level feedback.
Basic Visual Elements in Low-Fidelity UX Prototypes
So, what are the basic visual elements in low-fidelity UX prototypes?
1. Grayscale and Basic Colors
Since the focus is on structure, it’s about speed, clarity and a focus on functionality, it’s best to use grayscale of basic colors that avoid distractions.
2. Minimal Typography and Placeholders
Basic typographies allow stakeholders to get an easy view of how text layouts will look, instead of getting into fonts to use.
3. Basic Shapes and Icons
It’s about mapping the layout, so basic shapes help convey the flow much better than polished ones.
4. No Clear Visual Hierarchy
In low-fi prototypes, there’s no defined hierarchy. Instead, that gives way to basic outlines which are focused more on clarity and not design.
Interaction Patterns in Low-Fi UX Prototypes
Low-fidelity prototypes feature basic interactions to simulate user journeys without complex functionality.
1. Simple Navigation Flows
Basic navigation paths outline how users move through the interface, focusing on core functionality.
2. Limited Click-Through Functionality
Easy, click-through interactions allow users to test primary flows, such as moving between screens.
3. Basic State Changes
Basic changes in states, like hover effects, keep the prototype focused on essential interactions.
Common Low-Fidelity UX Prototyping Methods
Low-fidelity prototyping methods prioritize speed and flexibility, enabling rapid exploration of ideas.
Paper Prototyping and Sketching
Hand-drawn sketches on paper allow quick visualization and iteration of concepts.
Digital Wireframes
Tools like Balsamiq create digital wireframes, offering structured yet simple layouts.
User Journey Maps
Journey maps outline user interactions, highlighting key touchpoints and flows.
Basic Interactive Mockups
Simple mockups in tools like Figma enable clickable prototypes with minimal visuals.
Tools Popular in Low-Fidelity UX Prototyping
Tools like Figma, Balsamiq, and Adobe XD support low-fidelity prototyping with wireframing and basic interaction features. Collaborative platforms like Miro enhance team ideation and feedback.
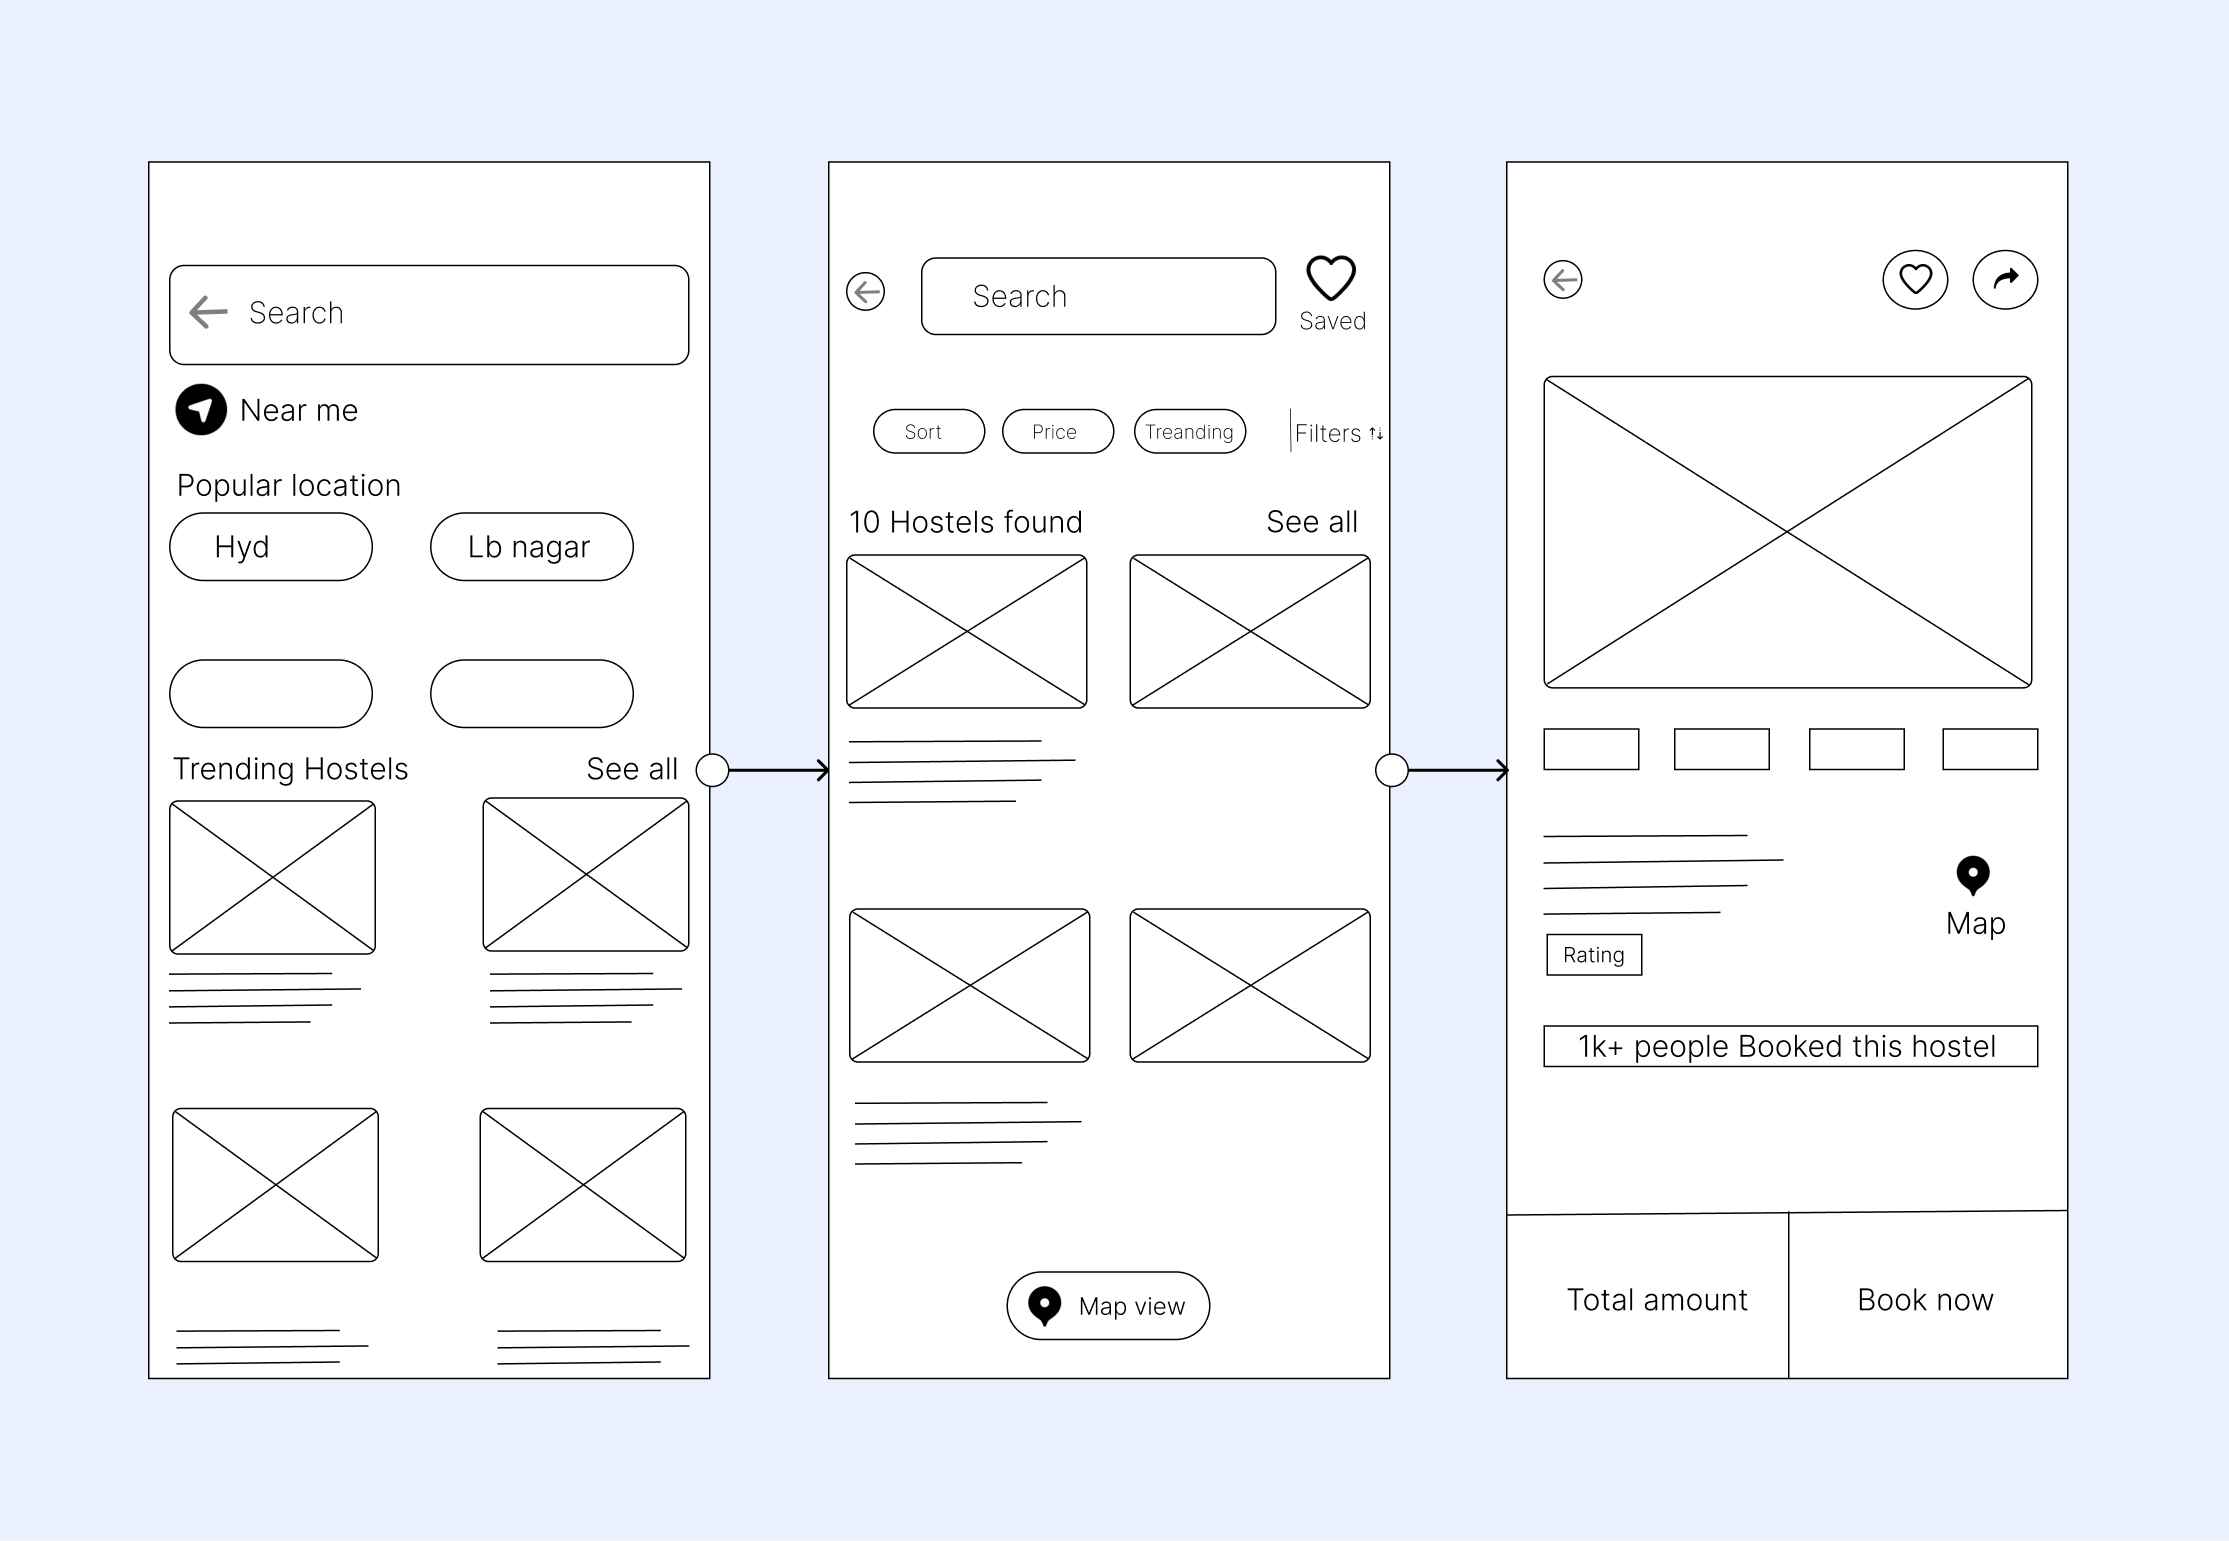
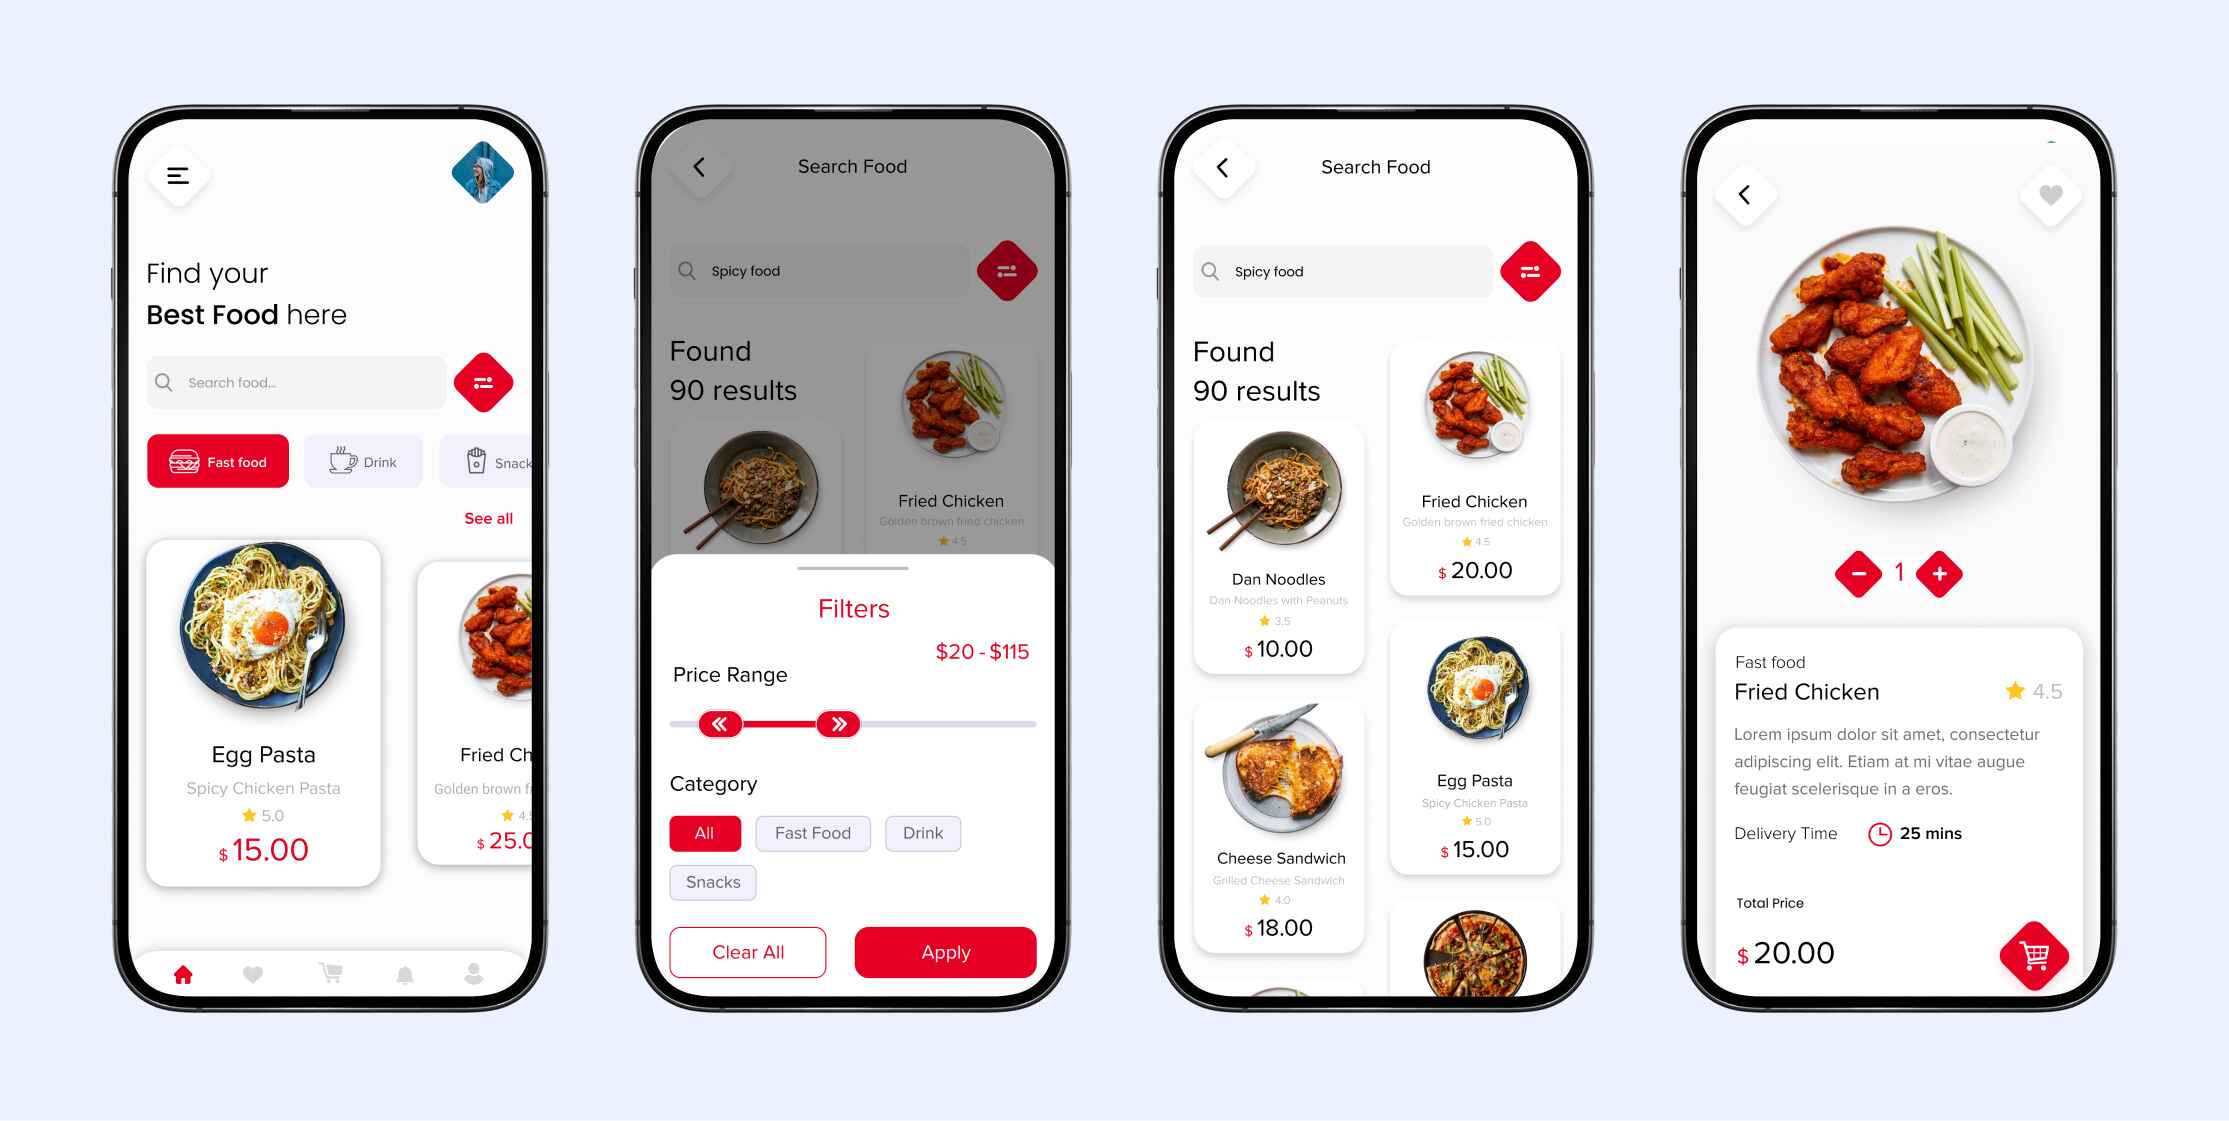
Understanding High-Fidelity Prototypes in UX
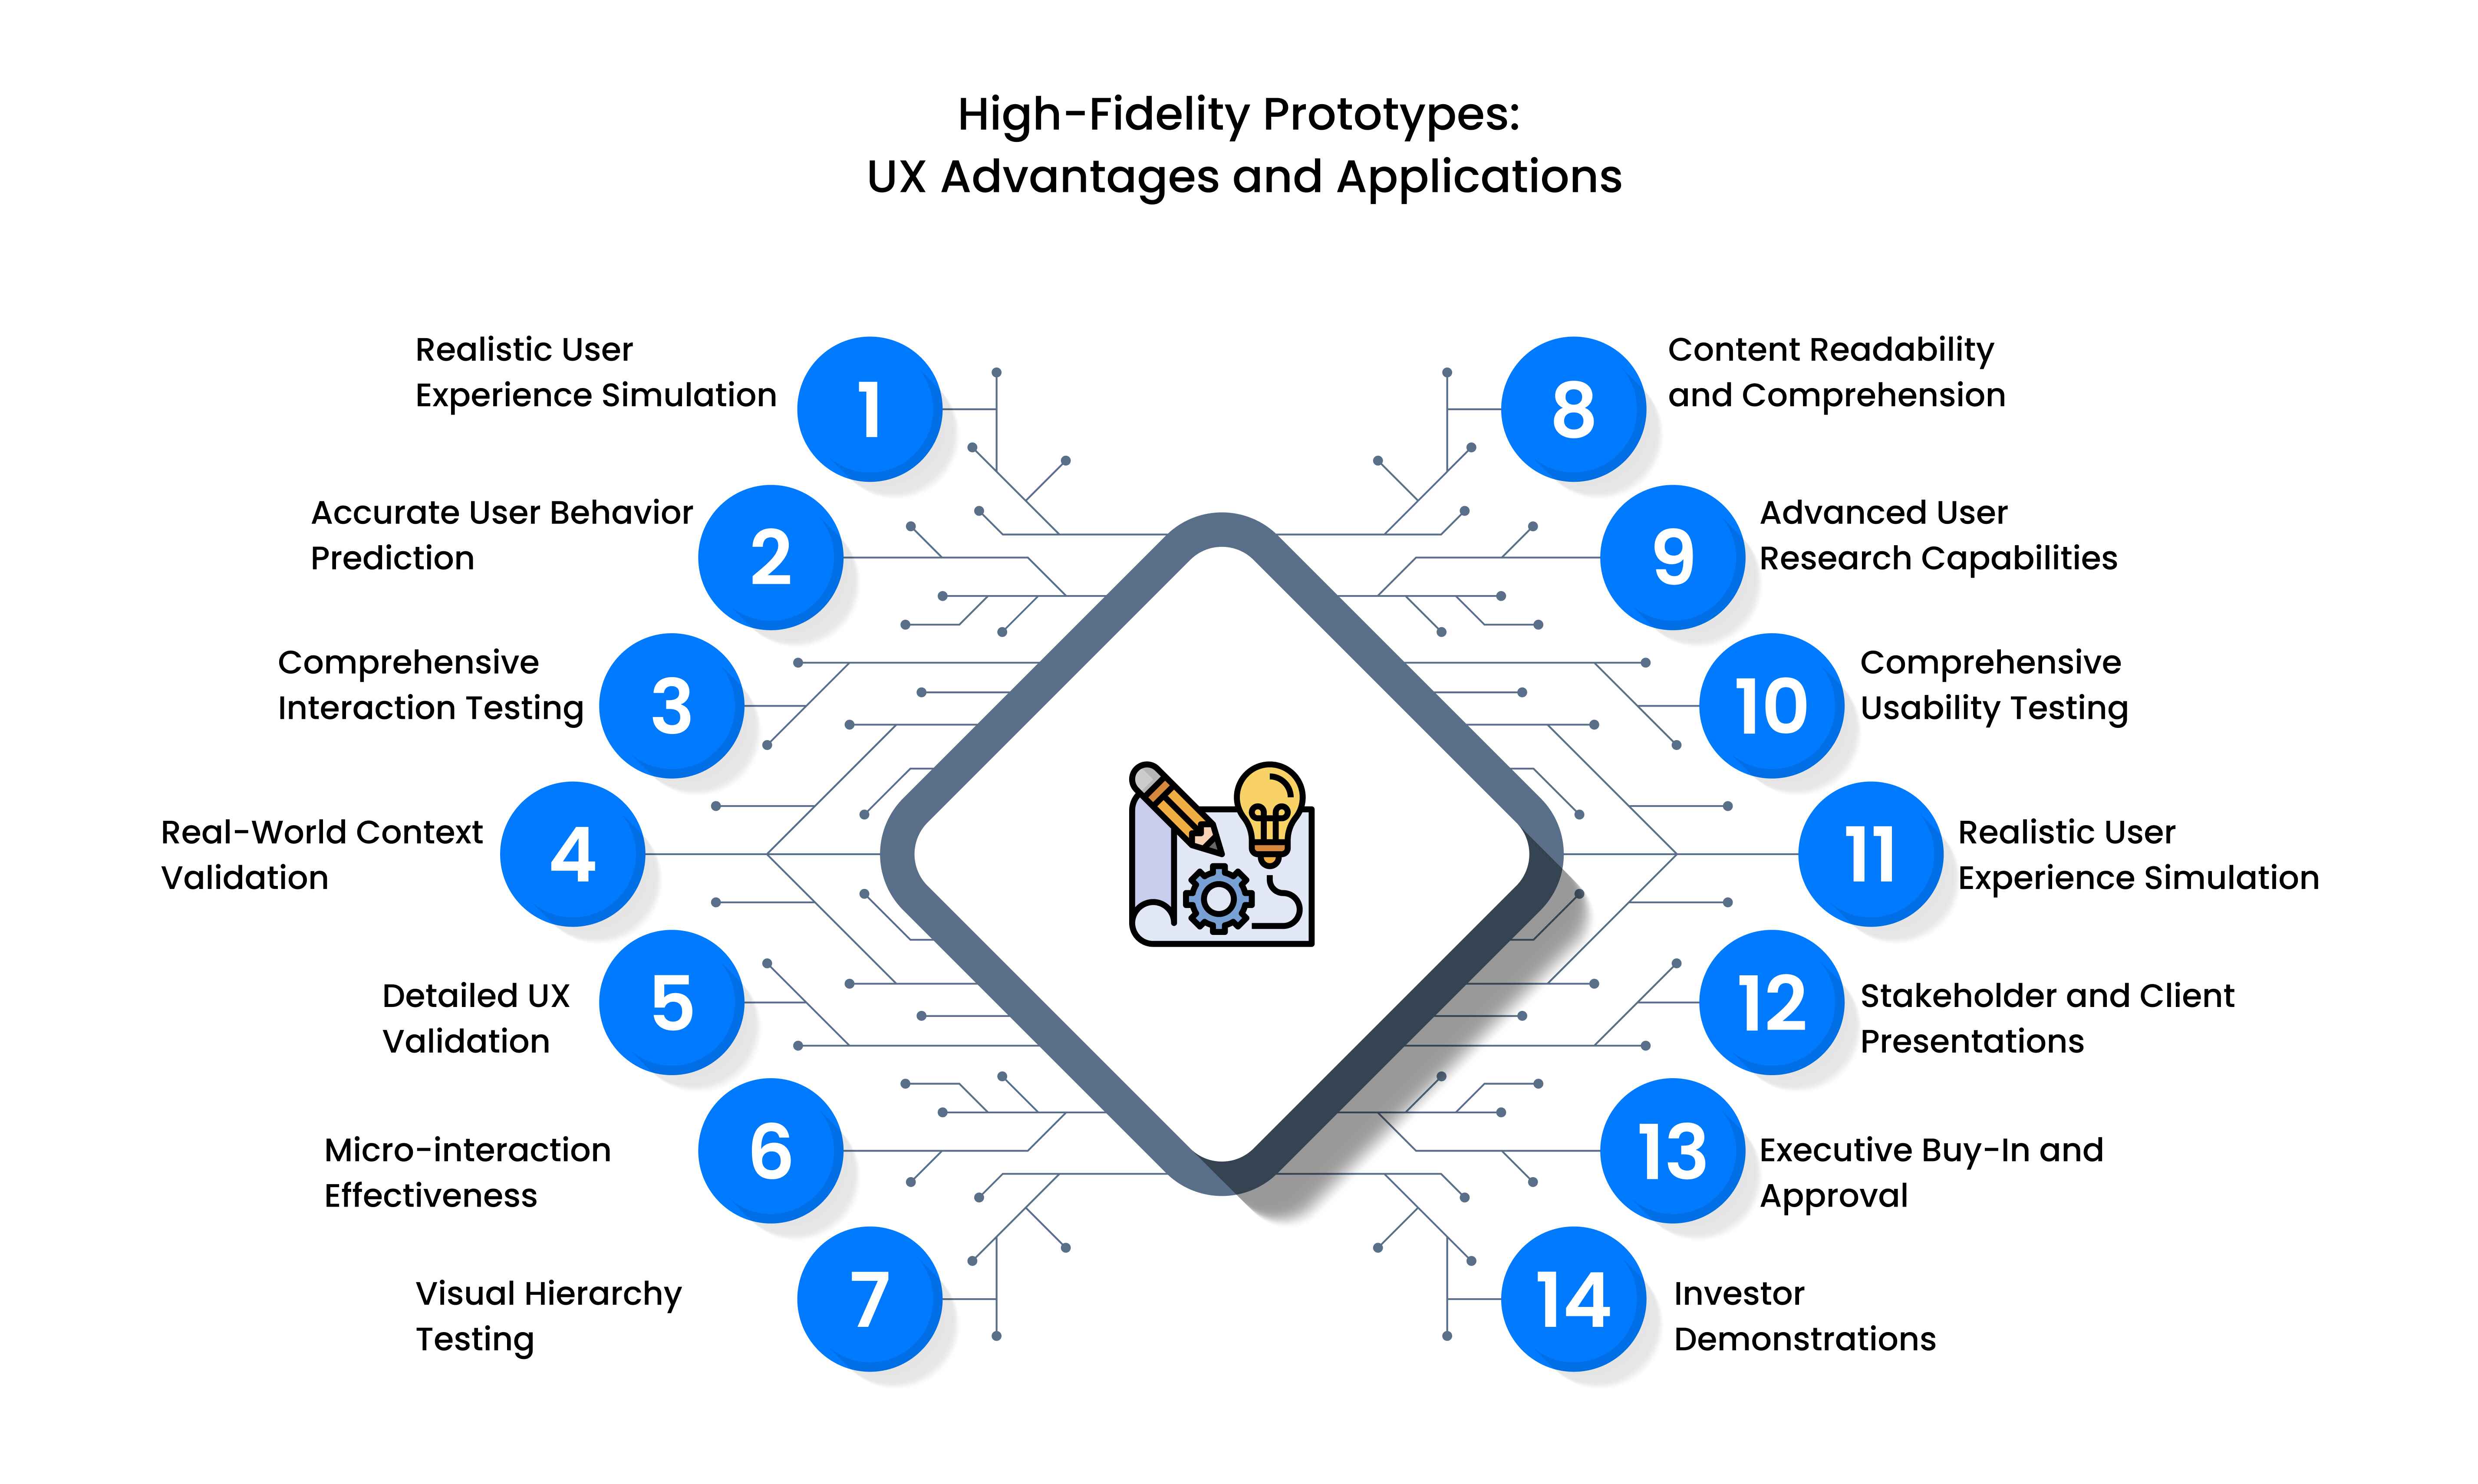
Think of your high-fidelity prototype as a working .html or figma file that resembles the final version. With detailed visuals, final-like functionalities and complex interactions, these prototypes make stakeholders go, “this is freaking awesome”. In terms of UX design, hi-fi prototypes simulate realistic user experiences, enabling precise testing and stakeholder alignment.
Basic Visual Elements in High-Fidelity UX Prototypes
Since, at the high-fidelity prototype level, it’s more about polished visuals that mirror the final design’s look and feel, these are the basic visual elements used for high-fidelity prototypes.
Brand Colors and Typography
Brand-specific colors and fonts ensure consistency with the product’s visual identity.
High-Quality Images and Graphics
Detailed images and graphics enhance realism, reflecting the final product’s aesthetic.
Detailed UI Components
Refined buttons, forms, and menus replicate the final interface’s functionality.
Comprehensive Visual Hierarchy
A clear hierarchy organizes content, guiding users through the interface intuitively.
Interaction Patterns in High-Fi UX Prototypes
High-fidelity prototypes incorporate advanced interactions to simulate real-world usage.
Complex Navigation Systems
Sophisticated navigation mirrors the final product, testing intricate user flows.
Micro-interactions and Animations
Subtle animations, like button transitions, enhance the user experience.
Form Validation and Error States
Realistic form behaviors, including error messages, ensure functional accuracy.
Dynamic Content and Data Integration
Dynamic elements, like live data feeds, replicate real-world functionality.
Common High-Fidelity UX Prototyping Methods
High-fidelity methods focus on realism and detailed testing.
Interactive Digital Prototypes
Tools like Figma create clickable, realistic prototypes for user testing.
Coded Prototypes
HTML, CSS, and JavaScript prototypes simulate functional interfaces.
Motion Design Prototypes
Tools like After Effects showcase animations and transitions.
Multi-Device Responsive Prototypes
Responsive prototypes test designs across devices, ensuring adaptability.
Tools Popular in High-Fidelity UX Prototyping
Figma, Adobe XD, and Framer enable high-fidelity prototyping with advanced interaction and animation features. Code-based tools like React support functional prototypes.
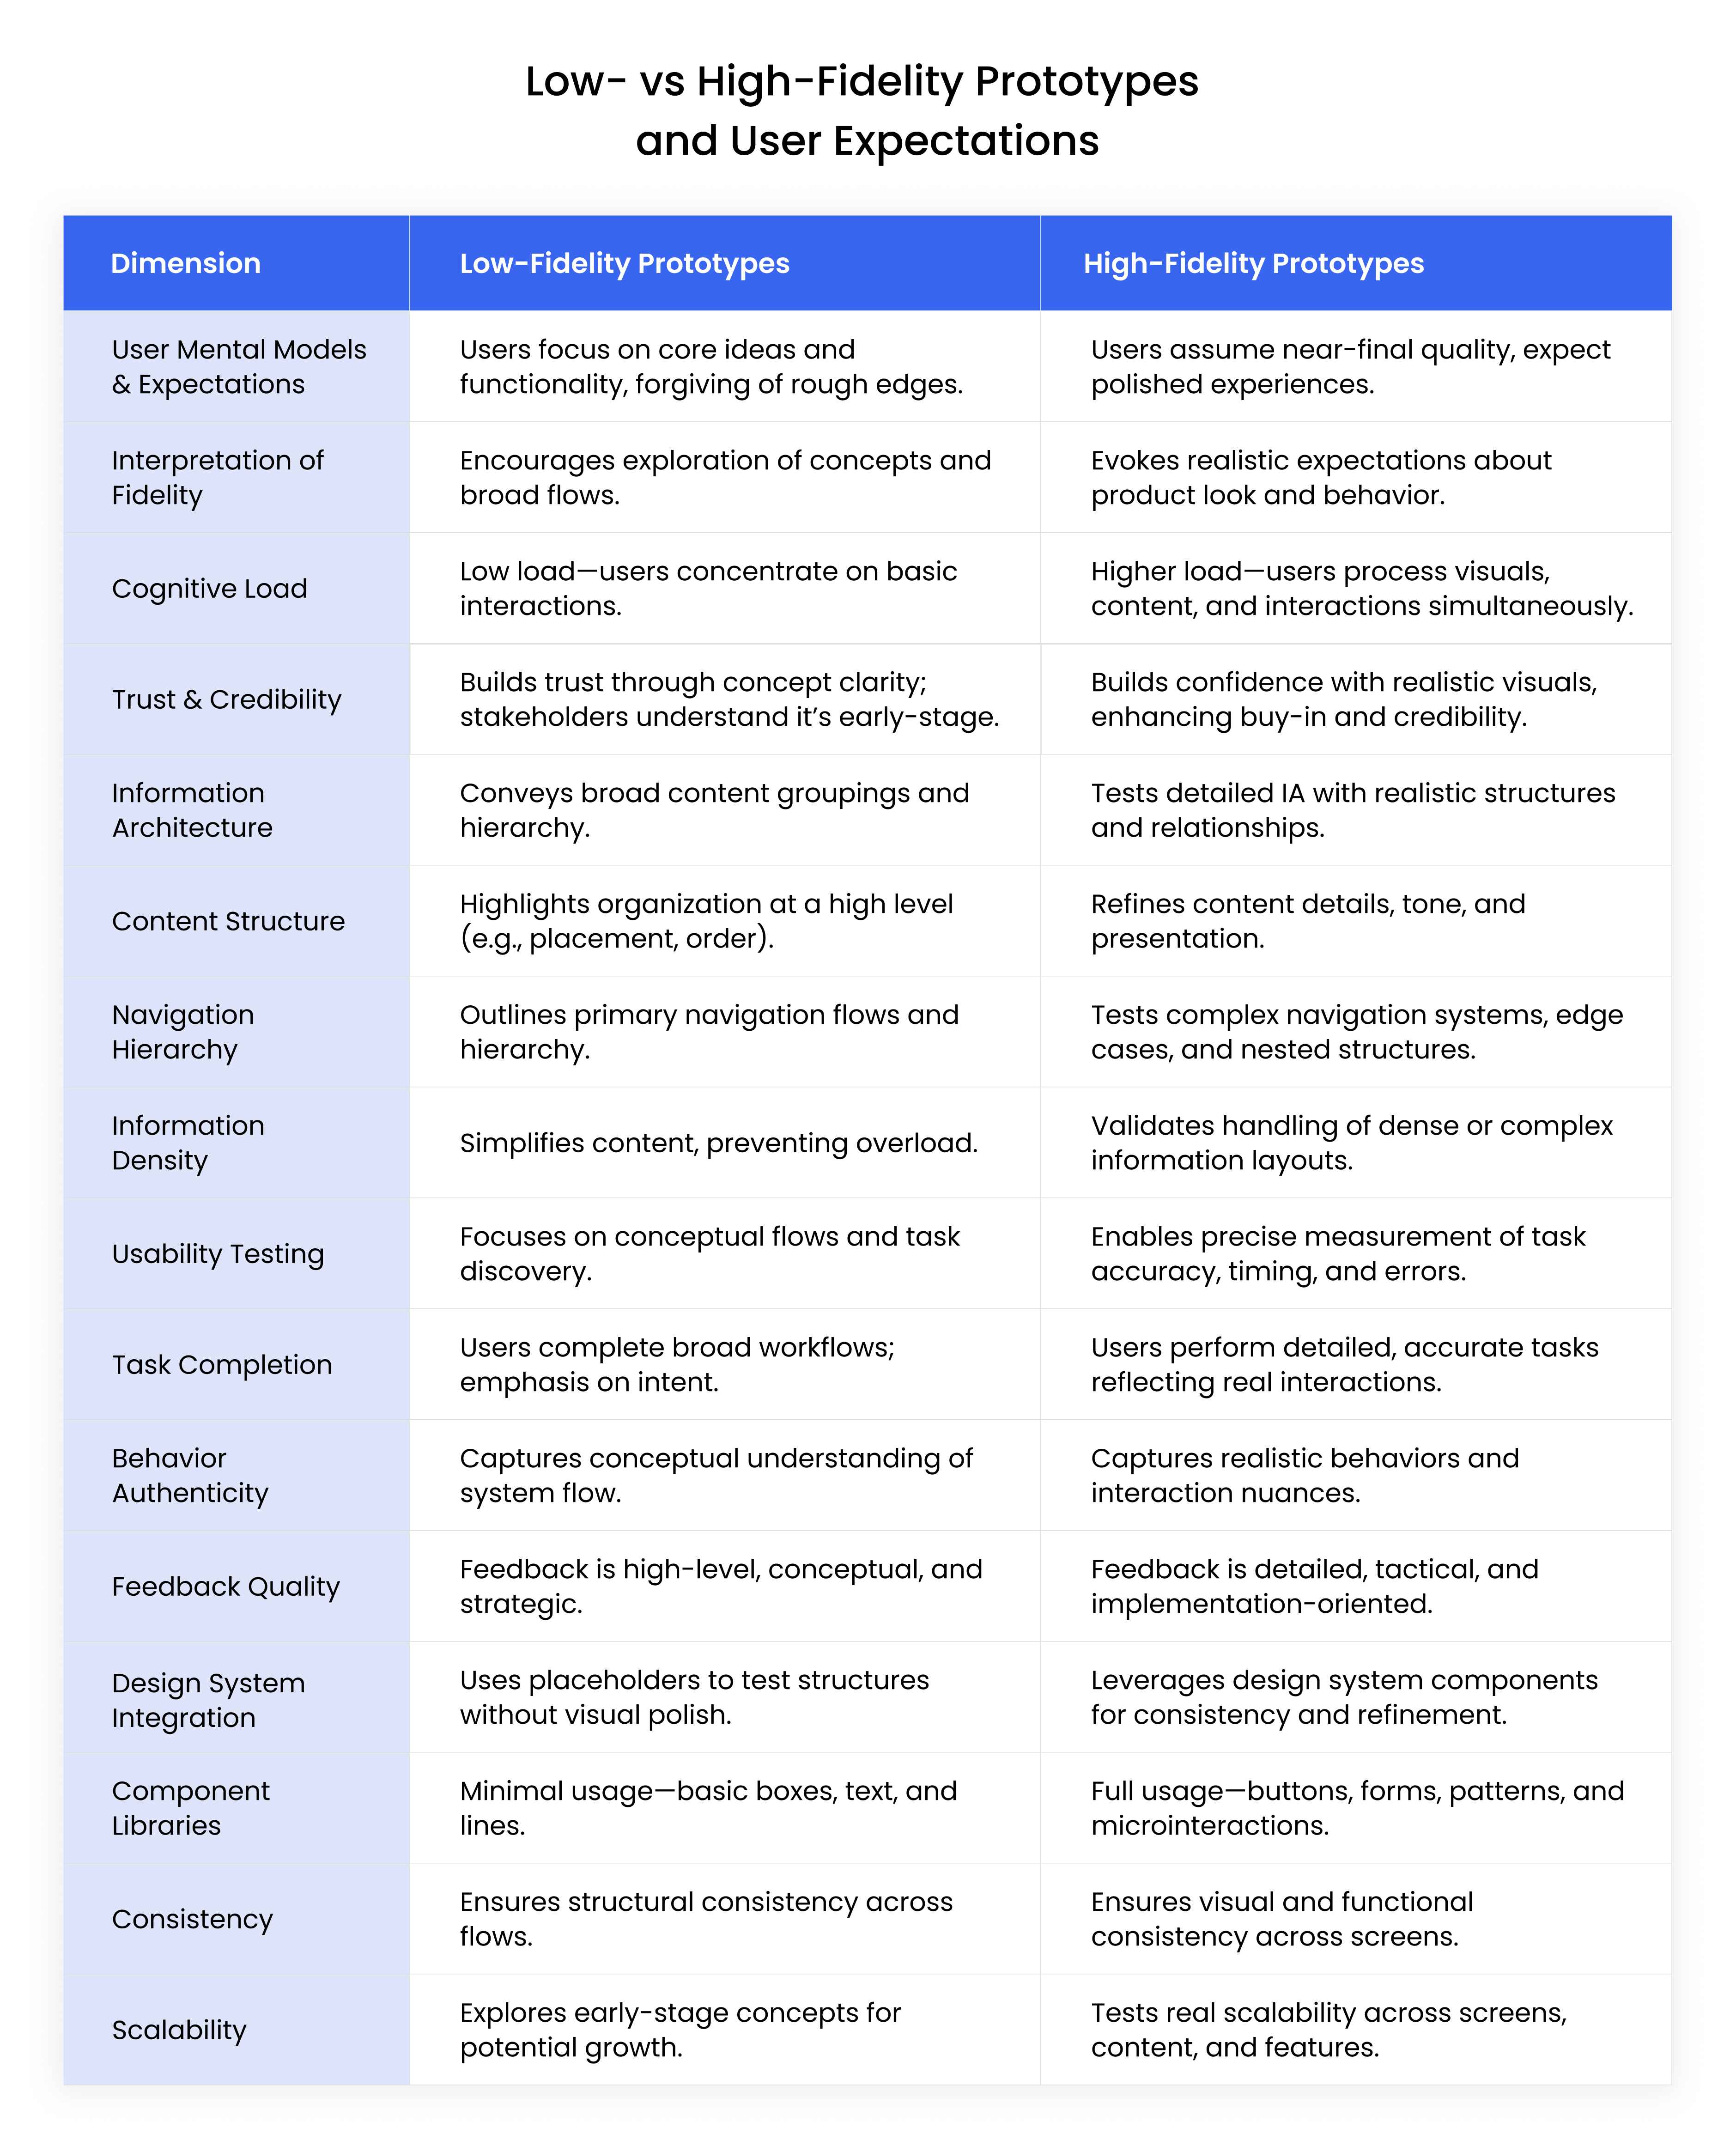
The Difference Between Low and High-Fidelity Prototypes
User Mental Models and Expectations
Low- and high-fidelity prototypes shape user perceptions differently, influencing testing outcomes.
How Users Interpret Different Fidelity Levels
Low-fidelity prototypes encourage focus on functionality, while high-fidelity versions evoke realistic expectations.
Cognitive Load Considerations
Low-fidelity designs reduce cognitive load, emphasizing core interactions, while high-fidelity prototypes test complex interfaces.
Trust and Credibility Factors
High-fidelity prototypes build trust with realistic visuals, while low-fidelity versions prioritize concept clarity.
Information Architecture Representation
Fidelity levels impact how information architecture is conveyed and tested.
High-fidelity prototypes yield detailed feedback, while low-fidelity versions provide high-level insights.
Design System Integration
Fidelity levels affect how design systems are applied.
Component Library Usage
High-fidelity prototypes leverage detailed component libraries, while low-fidelity versions use basic placeholders.
Consistency Across Screens
High-fidelity designs ensure visual and functional consistency, while low-fidelity prototypes focus on structure.
Scalability Considerations
High-fidelity prototypes test scalability, while low-fidelity versions explore initial concepts.
The UX Design Process: When to Use Each Fidelity Level
UX designers are the ones who ask “How does it feel?” “Is it intuitive?” and so on. And, when it comes to employing the right fidelity level, it’s about knowing what fits where. Here’s a table to indicate each phase and focus area.
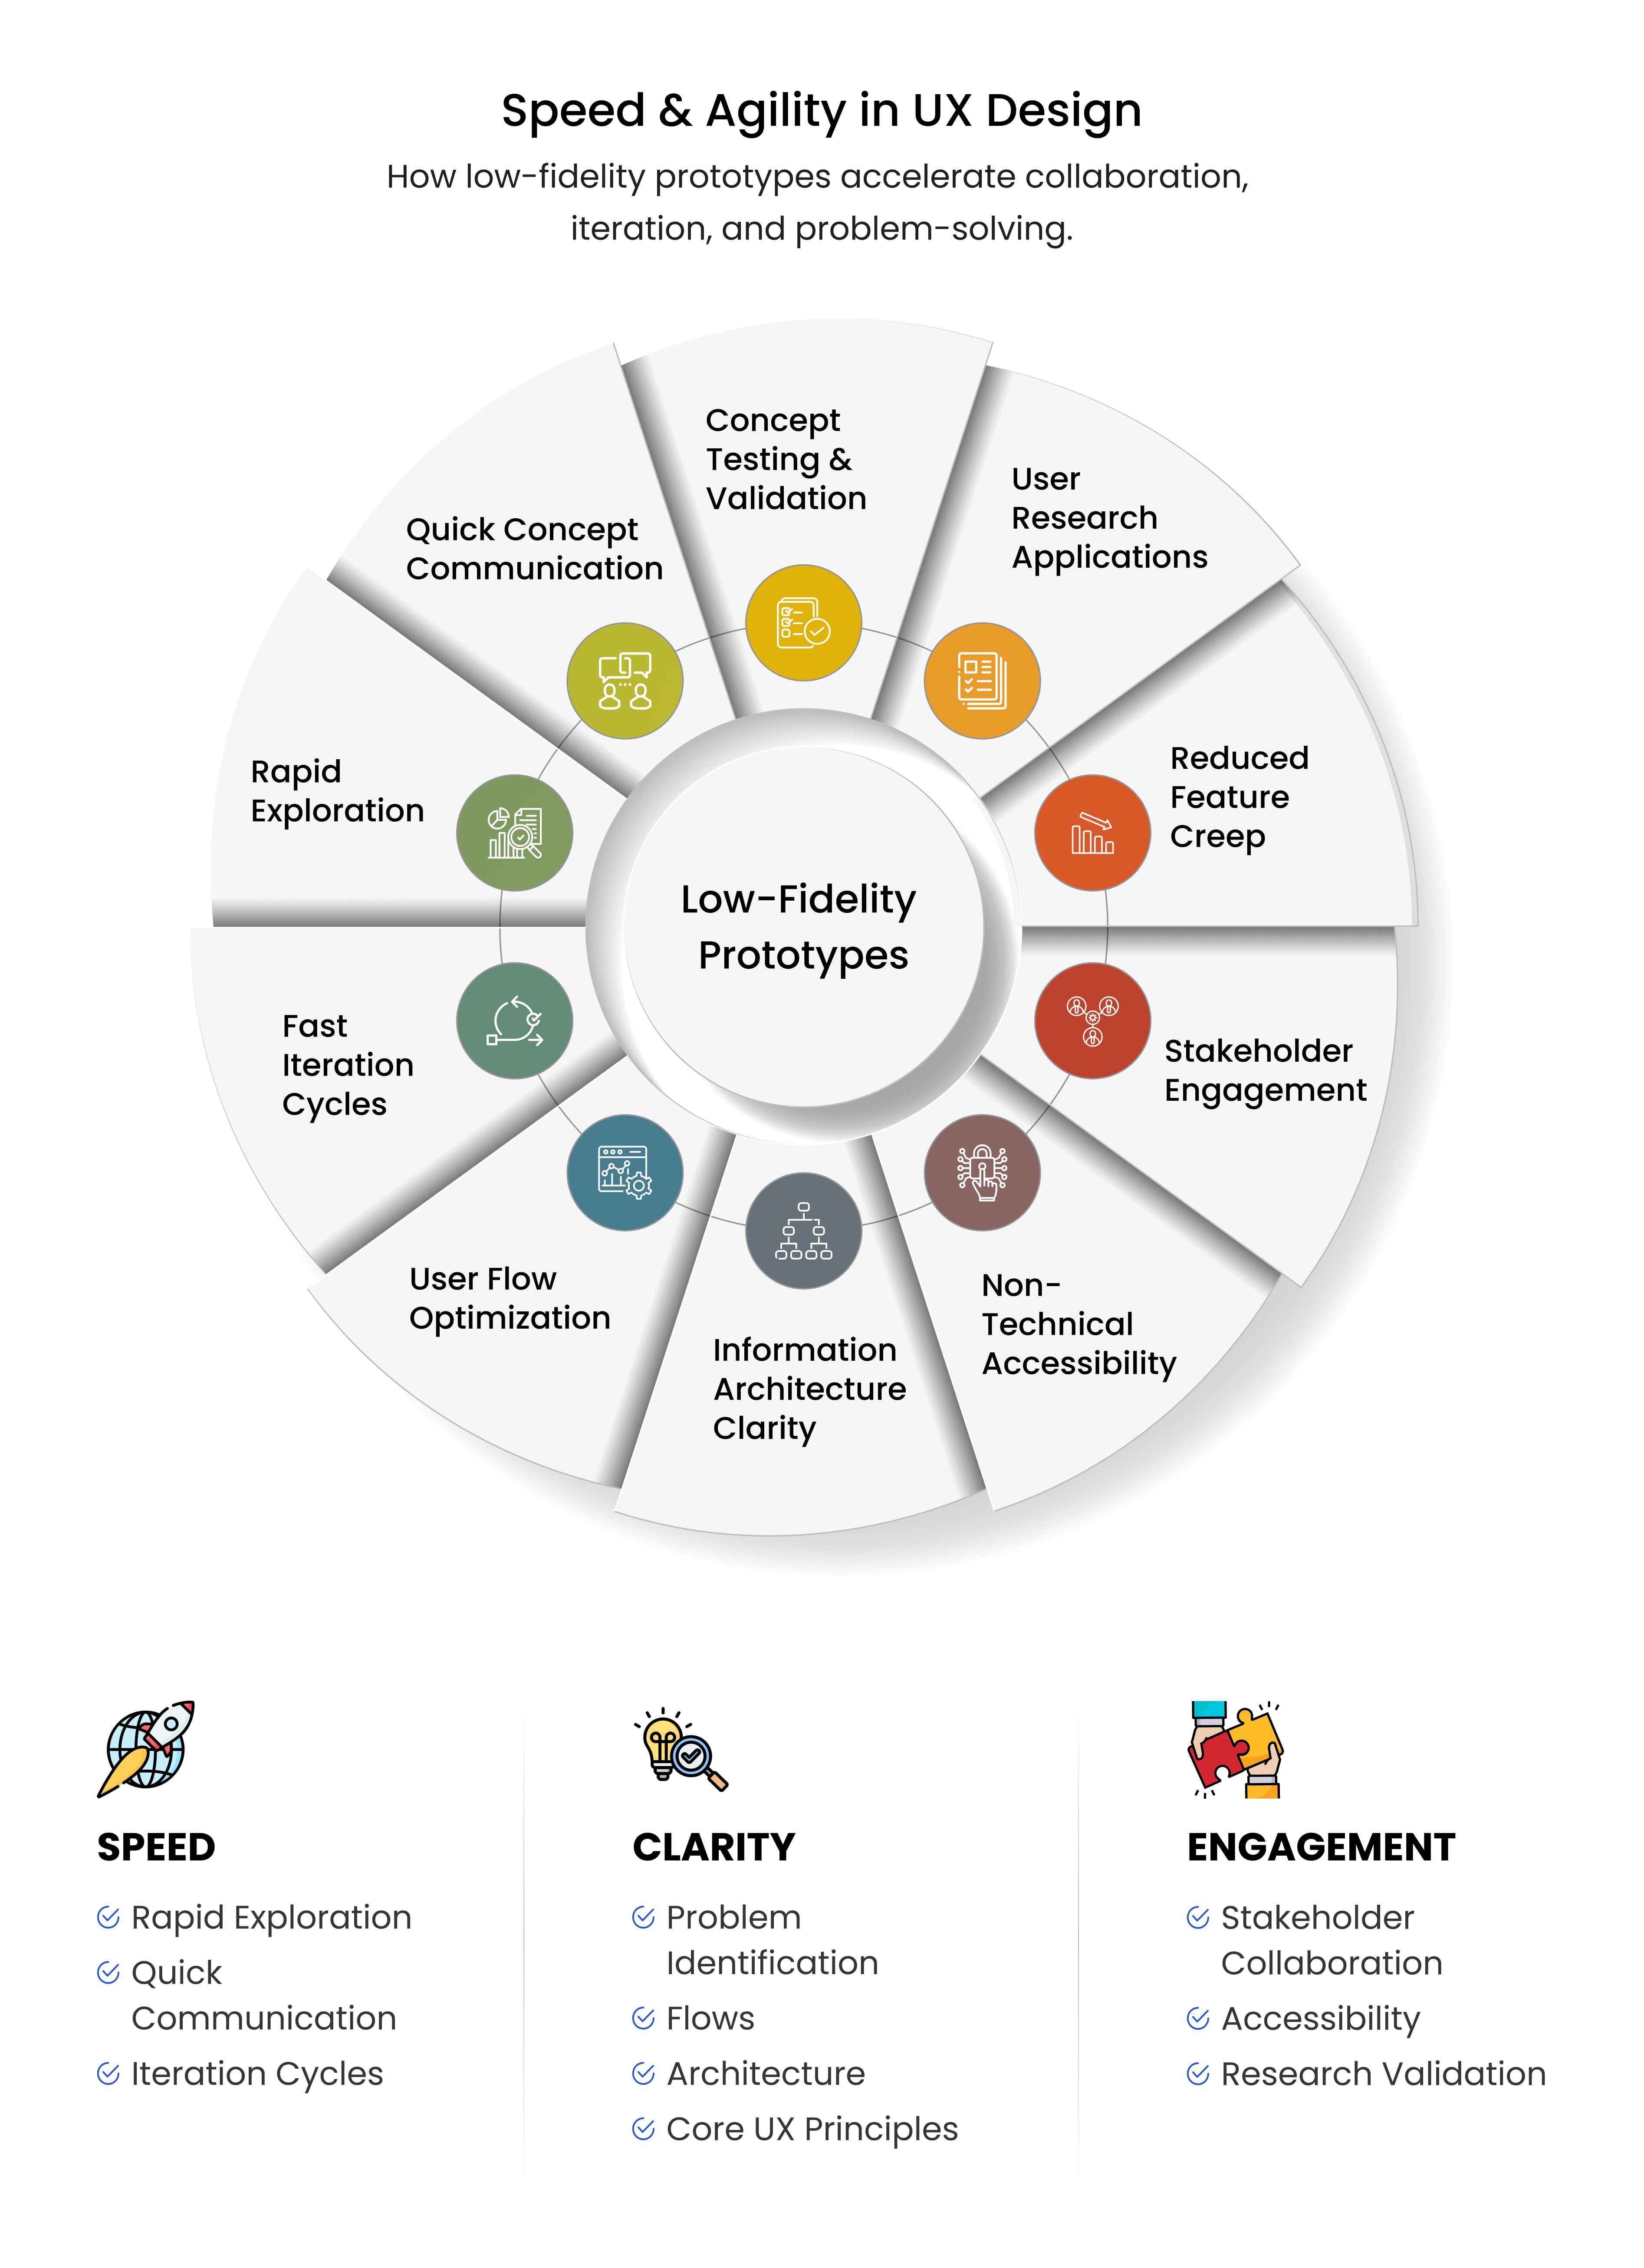
Low-Fidelity Prototypes: UX Advantages and Applications
Here’s a detailed breakdown on the advantages and applications of low-fi prototypes – 1. Speed and Agility in UX Design – Low-fidelity prototypes accelerate the design process, enabling rapid exploration.
2. Rapid Concept Communication – Simple visuals convey ideas quickly to stakeholders and teams.
3. Quick Iteration Cycles –Low-fidelity designs allow fast revisions based on feedback.
4. Early Problem Identification –Basic prototypes reveal usability issues early, saving resources.
5. Focus on Core UX Principles –Low-fidelity prototypes prioritize functionality and user needs.
6. User Flow Optimization – Simple designs refine navigation and task flows.
7. Information Architecture Clarity – Wireframes clarify content organization and structure.
8. Functionality Over Form – Low-fidelity prototypes emphasize usability over aesthetics.
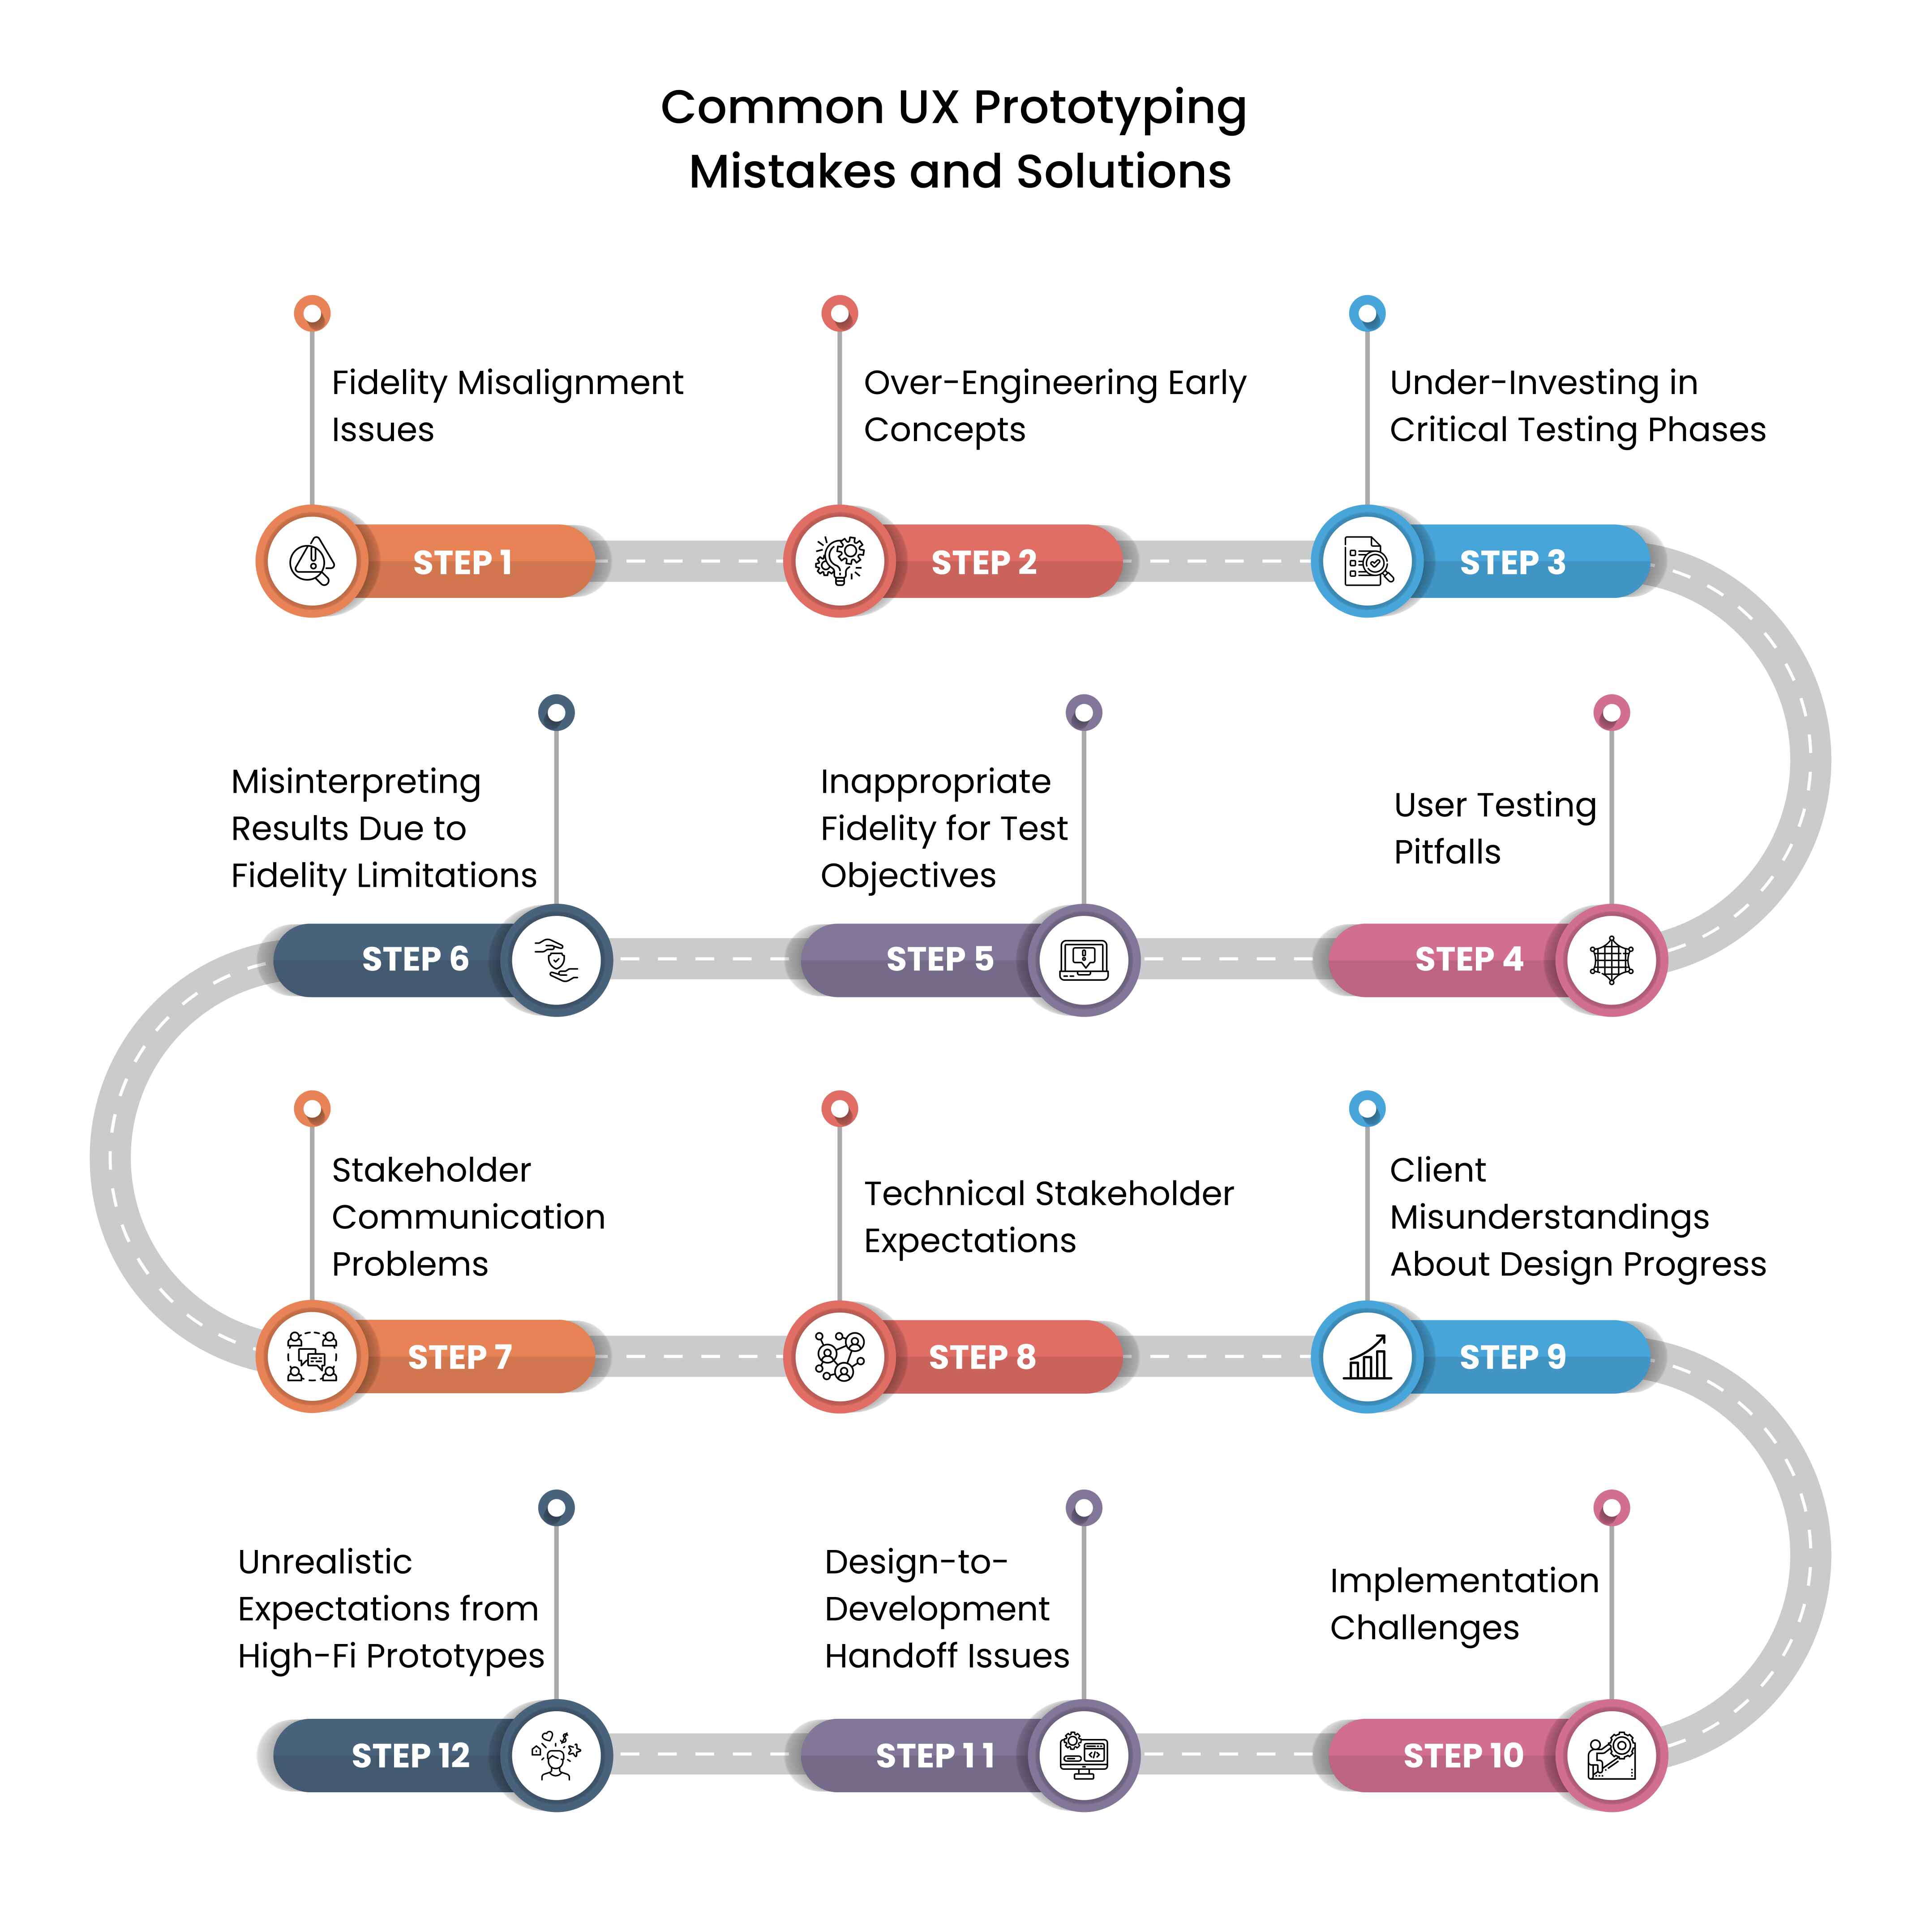
There’s many mistakes designers can make while making UX prototypes,
Here’s list of a few mistakes and solutions to them –
1. Fidelity Misalignment Issues – Choosing the wrong fidelity can derail projects.
2. Over-Engineering Early Concepts – Avoid detailed designs early; use low-fidelity prototypes for ideation.
3. Under-Investing in Critical Testing Phases – High-fidelity prototypes ensure thorough testing for final validation.
4. User Testing Pitfalls – Fidelity impacts testing effectiveness.
5. Inappropriate Fidelity for Test Objectives – Match fidelity to testing goals, using low-fidelity for early feedback and high-fidelity for detailed insights.
6. Misinterpreting Results Due to Fidelity Limitations – Understand fidelity’s impact on user feedback to avoid skewed results.
7. Stakeholder Communication Problems – Clear communication prevents misunderstandings.
9. Client Misunderstandings About Design Progress – Low-fidelity prototypes set realistic expectations early.
10. Implementation Challenges – Prototypes must align with development realities.
11. Design-to-Development Handoff Issues – High-fidelity prototypes provide clear specifications for developers.
12. Unrealistic Expectations from High-Fi Prototypes – Communicate that high-fidelity designs are not final products.
What Tools Are Tools and Technologies for UX Prototyping
There are many tools used by UX designers for prototyping. The most common ones that come to mind are –
Low-Fidelity UX Prototyping Tools
Low-fidelity tools prioritize speed and collaboration.Here’s a list of what works best for low-fidelity –
Sketching and Wireframing Applications
Balsamiq and Figma offer intuitive wireframing for rapid ideation.
Collaborative Whiteboarding Platforms
Miro and MURAL support team brainstorming and feedback.
High-Fidelity UX Prototyping Tools
High-fidelity tools enable detailed, interactive designs. A few common ones include –
Advanced Design and Prototyping Platforms
Figma, Adobe XD, and Framer create polished, interactive prototypes.
Code-Based Prototyping Solutions
React and Vue.js support functional, coded prototypes.
Tool Selection Criteria for UX Teams
Choose tools based on team needs and project goals.
Team Skill Levels and Learning Curves
Select tools that match team expertise for efficient workflows.
Integration with Existing Workflows
Ensure tools integrate with design and development processes.
Building Your UX Prototyping Strategy
Key Decision Framework for Fidelity Selection
Choose fidelity based on project stage, testing goals, and stakeholder needs. Low-fidelity prototypes suit early ideation, while high-fidelity designs excel in final validation.
Balancing Speed, Quality, and Resources
Balance rapid iteration with detailed testing, allocating resources based on project priorities and timelines.
Final Recommendations for UX Teams
Adopt a flexible prototyping approach, leveraging low-fidelity for exploration and high-fidelity for refinement. Use appropriate tools and align fidelity with project goals to create user-centered designs efficiently.
Here Is Where Unified Infotech Can Step In
With more than 15 years of experience in building out-of-the-box solutions, Unified Infotech is a pioneer in making UX and UI designs that’re intuitive, and ensure customer delight.
So, whether you’re looking for a full-fledged mobile app or a web application, we engineer applications that make a difference.
"Sreea Bhattacharya, Technology Lead – UI/UX, crafts intuitive digital experiences through user-centered design. She specializes in wireframing, prototyping, and visual design, translating business goals into engaging interfaces. With a strong focus on usability and accessibility, she ensures seamless interactions across platforms, enhancing user satisfaction and driving product success.”
Frequently Asked Questions (FAQs)
What is the difference between high-fidelity and low-fidelity prototypes in web design?
Low-fidelity prototypes are quick, simplified sketches or wireframes that focus on structure, layout, and basic functionality without detailed visuals, while high-fidelity prototypes are polished, interactive models that closely mirror the final website’s look, feel, and user interactions, making them useful for testing design accuracy and usability.
When should I use a low-fidelity prototype for my website?
Low-fidelity prototypes are best in the early stages of web design, when you need to brainstorm, map out user flows, and validate ideas with stakeholders quickly without investing too much time or resources in visuals or interactivity.
What are the benefits of using a high-fidelity prototype in web design?
High-fidelity prototypes help simulate the real user experience, showcase branding and visual design, test detailed interactions, and align both stakeholders and developers on the final look and feel of the website before development begins.
How do prototypes improve the web design process?
Prototypes streamline the design process by turning abstract ideas into tangible visuals, allowing teams to collaborate more effectively, identify usability issues early, and refine concepts before development, ultimately saving time and reducing costly rework.
How do prototypes help with user testing and feedback?
Prototypes give users a realistic way to interact with a website before it’s built, making it easier to gather feedback on navigation, usability, and content clarity, and providing actionable insights that guide improvements in design and functionality.
What tools are used to create high-fidelity and low-fidelity prototypes?
Low-fidelity prototypes are often created with simple tools like pen and paper, Balsamiq, or basic wireframing apps, while high-fidelity prototypes typically use advanced design platforms such as Figma, Adobe XD, InVision, or Sketch to simulate detailed visuals and interactions.
What is the role of wireframing vs. prototyping in web design services?
Wireframing defines the structural layout of a website—focusing on content placement and flow—while prototyping takes that framework further by adding interaction, design elements, and functionality to create a more realistic preview of the user experience.
How do prototypes ensure my website matches my brand vision?
By combining visual design elements like typography, colors, and imagery with interactive flows, prototypes let you see how your brand identity translates into a digital experience, ensuring consistency, coherence, and alignment with your overall brand vision before development starts.
Related Resources
A Unified Vision That Caters to Diverse Industry Demands.
UI/UX Design
Understanding Information Architecture in UX with Process, Benefits, and Examples